Monday, May 16, 2011

Zhena's Gypsy Tea- Peach Ginger Black Tea

I just want to say... Yum! Being in the PNW, I'm proud to say we are the home of Starbucks and many other fine coffee companies.

While in Forks, WA with my best friend a few weekends ago, I saw this tea and thought it sounded delicious. Other than Starbucks Passion Tea in the summer and Peppermint Tea at night to help me fall asleep or relax I don't drink an overwhelming amount of tea.

I am now officially hooked on another beverage than coffee!

With the comforting taste of black tea, but the undernotes of the peach and ginger it has a 'sweet tangyness' I can't help but LOVE!

I was not paid, nor given any product to review in this post and actually am writing this without any encouragement; so it must be good!!

I bought my tin (of 22 tea bags) for $3.00 on clearance at Forks Outfitters Coffee Shop, but I've found it on Amazon as well in 6 tin packs for about $4.75 a tin.

Enjoy!
Dawn

Saturday, April 16, 2011

Mason Jar Art with a 'Paper' Tree

I was surfing around online today, and through Amanda (from KevinandAmanda.com) I saw a link to this site. How much am I loving it you ask...? Enough that I can't stop thinking about all the awesome projects she does and start making some too!!! There really isn't enough time in a day to make all the things that she thinks she has too much time for! :-) I've never come across it before, and man; I've been missing out!!! I saw her project for the glass jar projects (which I linked you to above) and decided to go with this jar (an old mason jar I had around). To put inside the jar, I decided to make rolled paper flowers and adorn some branches, which I glued together and then stuffed into the jar.

This is a close up of the rolled flowers, and I rolled a few of them but using burlap instead for a primitive look.
This is where it's sitting right now, on the mantle; but really it would look great on a table.


I was even thinking I could make some easter eggs and hang those as well.


No one around here needs a new headboard; but I'm thinking... that in my dad's new house he is going to have extra bedrooms and my step-mom is also very into repurposing things and THIS headboard is amazing!


Have a good night!


Dawn

Monday, March 28, 2011

A Few of my Essential Tools...

I thought I would do a generic post today, with some of the items I use in almost every project I make.

From Cards to Layouts, Birdhouses to Bind-it-All books, I find myself consistantly reaching for the same products.

Cutting Fiskars 12" Rotary Trimmer --- I used to use the Provo Craft Paper Trimmer, and it was okay; I went through a lot of blades since it wasn't a rotary cutter and almost always seemed to have some sort of 'fuzz' along my cut before I splurged and bought this. I used a 40% off coupon at Michaels to help cut the cost a little!

Good Scissors (Full Size)-- I use the Corporate Express Brand, and they are from one of the office supply stores, and scissors you do decide to designate for paper only, I recommend you write that on them, and make it clear throughout the household; it's amazing how quickly a pair of $20 scissors can become useless (not like I'd know....)

Better Scissors (Small, for detail)-- Cutterbees; I swear by these little scissors. They can cut everything (big or small) and always stay sharp. I clean them every so often (like few months) and they have never failed me. Be careful though, these seem to attract my three year old like a bee to honey (must be the pink color... and sharp blades).

X-acto Knife-- Mine is pink, but even if it wasn't; these are very inexpensive and so helpful! I've used it for peeling stuff off my Cricut Mat, or quickly trimming spots that didn't cut. Overall, very useful for the price.

Scoring-


Martha Stewart Scoring Board- Again; a great investment. I'd never had a scoring board before I bought this one with a coupon from the Oprah Show to try a Martha Product at a discount, and I can't believe I lived without it, for cardmaking, envelopes or boxes. It's nice to make the little medallion type circle things also!

Inks--

Stamping-- Staz On; any color. This stuff ROCKS! Seriously, it works on everything and creates clear, crisp images from even the cheapest clear acrylic stamps that dye inks don't work well on. LOVE this stuff!!


Tim Holtz Distress Inks- I have 9-10 colors, but love them all equally. They are all amazing.


Inkssentials Ink Blending Tool & Foams-- I use this tool everytime I use my Distress Inks.


Adhesives:


ATG 700 Gun w/ 1/4" Adaptor- I bought this before the Pink 1/4" gun came out, and paid a hefty sum for it; but even after that... I did a little breakdown/review of the costs... it can be found HERE and it still is less expensive than using Snails for the rest of my life.


Liquid- Scotch Quick Dry Adhesives-- seriously, don't put this on if you aren't sure you want paper to stick; it's gonna stick and FAST. Great for small cricut cuts.


Stapler- There is a company that makes colored staples, and I'm addicted to those too, so this gets used often also!


Feel free to ask any questions; I'd be happy to answer!!

Sunday, March 27, 2011

Wedding Card & Bee Happy Card

Here are a couple cards from recently! I know I haven't been posting often and I've been busy back at work, so it's made cropping time decrease a bunch.

The card above I made for a wedding this summer; the colors are Dark Blue and Silver; so I thought this would be gorgeous.

The lower card is intended to send to my Mother-In-Law who loves bees! I thought it would make her smile... now, all I have to do is get it in the mail!
Have a good one!

Dawn

Saturday, March 26, 2011

Updated Scraproom Stills

I thought I'd hop on here, and show some updated photos of my scraproom. It's nothing fancy, at all; just an extra bedroom that I've added a desk and storage (and not even fancy or pretty storage!) to, and made work for me.
I made a coloring and play area for Zoe, since she ends up in there with me. She always wants to help, but by making a coloring area, she at least is distracted!Everything I use consistantly is right within reach. All my paper, adhesives, ribbons, cutting tools and even embossing tools I can reach from my seat.
This is what the drawers look like; the very bottom is adhesives; and cards I am keeping. Next drawer up; it my paper pads that are 8X8 and smaller.


The middle drawer is all inks, and blocks. And the top is bink-it-all owires, etc.

I also attached a photo of how I store my clear stamps. I used a 3-ring binder, with We R Memory Keepers Photo Sleeves. Baseball Card holders would work too!

It closes right up, stores flat and makes it much easier to find what I want quickly; instead of digging through a pile.

Monday, March 21, 2011

Reminisce Superheroes Line

For my last project as a Designer on Lila's Scrapbooking Design Team,
I worked with the Reminisce Superheroes Line.
I love the cute little charactors, and how they are zipping around!


This little pig was my favorite!
Followed, not far behind with the little Superhero panda!
Cute, right? I have some other things to post shortly, so hopefully you'll be entertained some this week!!
Cheers!
Dawn

Monday, March 14, 2011

BasicGrey Bind-It-All Book

Seems like theres a 'B' theme going on here, huh? lol.


Today, my little project is with the same adorable BasicGrey Pyrus Line of papers, I bought at Lila's Scrapbooking but I've used my Zutter Bind-It-All with a 3/4" o-wire to make this adorable notebook. It's roughly 6.5"X4.5".


I've tied various olive green, brown and orange ribbon to the owire also.
Enjoy!

Sunday, March 13, 2011

BasicGrey Birdhouses

Hi! I know I've been off in my own world lately. Zoe was in the ER last weekend with a ruptured ear drum and ear infection; and today we had to head to the Walkin Clinic because she's got Croup. So, after dealing with a sick baby for more than a week; you can bet that I took some time for myself last night!


I made a cute little project, with some Basic Grey Paper I picked up while I was at Lila's Scrapbooking dropping off my Design Team Packet (I'm hoping for another round on the DT!)...

I have those photos too, but don't want to post em until the design team is announced, I'm not sure if they will be showing the projects turned in or not; so I'm not going to spoil the fun for anyone. :-)


All the paper I used is from Basic Grey, their line called Pyrus. You bet that I LOVE these papers and actually am going to stop in a pick up some more in the next day or two. I'm working on a sketch book with my Zutter and these papers also.

This is close ups of the actual birdhouses. I used this paper for the trims, 'walls' and roof of the birdhouses.

The birdhouses are from the Local Craft Store, but all the papers are from Lila's.
Enjoy!
Dawn

Monday, February 14, 2011

Valentine's Mailbox Project

For Valentine's Day I decided to decorate a Target mailbox (from the $1 bin) for Zoe and her little friend Riley.
I used the Paper from 3 bugs in a rug for all the coverings and the little cards.


Right now, they have the cards, and some little trinket type toys in them, but you bet your buttons we're stopping to stuff them with candy too!

We don't have any big plans for the night, just staying home (maybe a Heart Shaped Pizza is on order?)

Saturday, February 12, 2011

Valentine's Card for the hubbs

Hi Everyone!

In the past few days I've picked up the sewing machine I've been thinking about getting. Last night alone I made a 'comforter' (aka crappy little quilt) for Zoe's Zhu Zhu Pets and a pillow for them. That was fun, and today I've used it on Adam's Valentines card (because I left that last one out for him to see... opps, but turns out he never said anything so I don't think he really liked it anyways. This one though, is sure to wow him. :-)


I used a big, clear sentiment sticker, on graph paper, cut to size and adhered to a patterned cardstock from Bo Bunny's Easter Line in 2009 I believe.


The heart is punched with my sizzix original and a heart die. The burlap is actually from an old sack I've had in my trunk that I got to plant potatoes in... :-) Haven't gotten around to that yet, lol.

Hope you like!
Dawn

Saturday, February 5, 2011

Valentine's Day Inspiration and Copy Cat Cards

Last night, I was flipping through my January/February Paper Crafts Magazine and they have a lot of beautiful cards for Valentines Day.

This one was that caught my eye, for the sheer fact that I was pretty sure I had about everything to re-create a similar version. I needed to make a card for someone still (that I LOVE to kiss... heehee, my husband of course! There isnt' really any threat of him finding this card out until Valentine's Day; because I'm not kidding anyone here: there is about a 1% chance of him checking my blog to see what I'm up to!)

This is a shot of page 45 of the Paper Crafts January/February 2011 issue.


(blow the horns here...) Here is my similar version. I know it's not totally the same, but close enough!

Hope you like it! :-)

Sunday, January 30, 2011

^^^Look Up^^ We've got some changes...

All sorts of things for sale, check them out.
Stamp Lots, Purple Cow Freestyle Mouse, Stickers, Gift Boxes, and lots more!

Tuesday, January 25, 2011

Scrappy Mom's Terrific Tuesday Challenge!

Hi Everyone!!

I know I haven't been too present here, I've started working part time again at Doodlebug Sportz, and with my two days at Horse Head Quarters I've been busy. busy. busy. with minimal time for crafting!!

Anywhoo, it's been a while... a L-O-N-G while since I did any challenges... but here is one I saw today while I was browsing over at Lauren's Creative, where she is a design team member for Scrappy Moms Stamps. Her project is adorable, and I'm really loving the baker's twine. I found some on Etsy for only $3.25 for 100 yards, which I'm not sure if that is a good deal, but it sure sounds like it (without looking into it any further).

The challenge is to use Sweethearts Cricut Cartridge, or something similar... I don't have Sweethearts, but I do have Wedding Solutions; so I've used it.

The base of the card textured yellow cardstock from the Mi Casa Stack by DCWV. Size is 10X5.5, scored at 3"& 7" and folded inwards.
The Just Married Car is cut at 2.65" from the Wedding Solutions Cartridge. The shadow is the same yellow as the base, with a white blackout layer and a black top layer. I used a metallic silver for the cans.
I've used my new Imagine to print the gingham background from Imagine More. I printed it as a full page and cut it to what I needed for lining the fronts and inside of this card.

The stamp on the inside is from Studio G, from Michael's in the $1 bin.

I've used a black, felt tip marker for the dotting around the card.

So, shhhhhhhh because I know of a couple getting married in the next few months, and vintage cute is totally her style, and even if the colors are off completely, this card will probably go to them.

Hope everyone is doing well!

Cheers!

Dawn


Wednesday, January 12, 2011

Imagine Time!

First off, I needed to share this adorable photo of Zoe, being cute. :-) I hope it makes you smile!

Onto the real topic!


Being at work 5-7 hours a day is really a big change for me. I've been staying home for the last 2 years or so (just short of it) and a few months ago was offered a job by my Dad, who was always the best boss I've ever had. He offered me basically as many hours as I could get (up to official part time) bringing Zoe with me and selling his Harley Davidson stuff online. He is quite the entreprenuer; this is his second business! So, he started his ebay business and had me running it.
Then, he needed some help with the accounting department at Doodlebug Sportz; his labor of love. So, I started helping there. I've transitioned to being the Office Manager for his company with a side of Harley Davidson. :-) It's a nice thing to have; and I'm greatful that I get to bring Z with me everyday. Today though, was a long one for me. I got there about 11, with plans of staying until 6:40pm or so to head to my Mothers and More meeting. I am the membership coordinator for our chapter; and we had a board meeting at 7pm.
Well come about 5, I made the decision that my mental state was too important for me to have so much going on today, and I got rolling with what I was doing; and was home by 6:45 or 7 to find out that my Imagine had shown up!
I don't want to make it seem like my Expressions has gotten bumped down on the food chain just yet; because obviously I'm still learning my Imagine, but here is the Provo Craft Lineup in my house:

Cheers!

Dawn

Tuesday, January 11, 2011

Reminders of a Warmer Time

Today, I left work early because there was supposed to be a 'major storm' hitting at 4pm. I was home about 3:40 to make sure I didn't have another 2 hour communte (normally 15 minutes).
It just started snowing outside here; and I'm hoping that it sticks so I can make this delicious ice cream recipe from Blooming on Bainbridge (which happens to be just down the road from my house!) which she posted back in November, during another snowy time here.
With that said; it's C.O.L.D-- colder than I prefer here now. Here is a brief glimpse into our summer.....
the dog spent plenty of time under the big shady Rhody in the front yard, and Zoe and I joined her during the summer to cool off! It got so hot here this summer, I had to set up an easy-up (pop up) to put the pool under so she could actually cool off, since the shade and water was about the only way that was happening (other than an ice bath).
Anyways, here's to it staying cold long enough for ice cream, but not long enough it keeps me home! :-)

Sunday, January 2, 2011

Ladybug Book

Do you have any idea what this could be? It's an 11.5" Ladybug... It is going to be at Riley's 3rd Ladybug Birthday Party (probably, as long as Mommy Steph okay's it :-) .
It's a BOOK!
A guestbook or small scrapbook or something like that. I added some pages with white cardstock, googly eyes and a prima flower with a brad to make it open/close and be a girl ladybug (because no doubt there are boy-ladybugs too, somewhere)
I started with the cover, cut at 32" (using the fit to page feature on my expressions) and then my gypsy to make the pages 32", since the expressions only goes to 24.5" on the dial.
Hope you like it!
Dawn

Saturday, January 1, 2011

Riley's Ladybug Birthday!

My good friend Steph and I have been preparing for her daughter's 3rd Birthday. Riley wanted to have a Ladybug Party, and lucky for her; I was totally willing to help!


For Zoe's Birthday, back in October it was Mickey Mouse Themed, so I made a Red, Black and White banner; and I've reused it here and changed the name to Riley, switching the mickey heads for Ladybugs! I got lucky with this one, because I would have made her a whole new one if she wanted something that the colors wouldn't have worked with. :-)

All the ladybugs were made using Just Because Cards Cartridge, and the Banner Front was from the Mickey Font Cartridge, the scallops and circle were from Mini Monograms.

For Zoe's Party, I also made Mickey Silouttes to hang from the ceiling, and we will do this again also, but with Ladybugs.

Monday, December 27, 2010

Holidays are here!

I hope everyone had a merry christmas, I know in our house it was very Jolly!

On Christmas Eve, my brother Danny and his longtime girlfriend, Ann got Engaged! Yay for an engagement shoot and Danny finally doing it!

I was surprised christmas morning to find out Adam got me an Imagine... without me knowing! But, sad news is I need to call HSN and/or Provo Craft this morning to have it swapped out; because it's broken! One of the roller/bar things that runs across the bottom (under the mat) in the back of the machine was sticking up and blocking the path for the mat, so it couldn't print correctly, and then once I noticed and 'fixed' that issue (by pushing it into the right clips) it won't cut now. :-(


Anyways, I'm excited for playing with one that works in the next few weeks.


Adam also got me lots of other great things, a Bind-it-all; Unity Stamps that I've already made this little gem with:

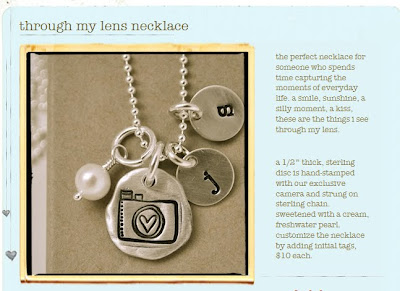
My mom is having a rough holiday season, so this card will be for her; I LOVE the quote. I also got a beautiful necklace I've been wanting, by Lisa Leonard Designs.This initial tags have a 'K' and a 'Z'.

I hope you had a great christmas also, and I will keep you posted on my journey to get a working imagine!

Dawn

Monday, December 20, 2010

Santa Flying Layout & Bokeh

So, it's been a while; as normal seems now-a-days. Last Friday, we opted out of the typical 'oh my G-- we forgot to take Zoe to see Santa, we'd better hurry this weekend!!' and took her on a Friday afternoon. Luckily, I'd gotten her 'dressed' that morning (which is totally out of our ordinary, since she normally chooses her own outfits; especially on a Friday since it's our 'short' day at work (Doodlebug Sportz for your paintball and extreme sports needs& Used HD Parts on Ebay for Harley Davidson parts).

So, we all know I broke the law here; by photographing a photo I had to pay for, but honestly they basically raped us for the one photo ($21 for a wimpy 5X7, which was more of a 4.5X6.5 anyways...) so here is my big girl with Santa! She was thrilled to tell him all about the 'teeny, tiny, little house' she wanted (being a doll house) 'like Phenyx has' she mentioned; hopefully Santa knows our good friends Phenyx & Keelen, eh?

I've made it into a Christmas Layout, using the My Mind's Eye Winter Wonderland Paper Stack and solid papers as well as some Tim Holtz Distress Inks and my Cricut Expressions, and Gypsy (with my FREE Christmas Cartridge I hadn't even looked at yet!) A HUGE thank you to Lauren, over at Lauren's Creative; because honestly; I had no clue this image was on the cartridge until I saw a layout she did using it with her adorable daugher on it.

Here is a close up of the sign I used, it's also from the 'Christmas' Cartridge that I got on my last Gypsy Upload for FREE!


I distressed the 'wood' of the sign using Antique Linen, Tea Dye and Walnut Stain Distress Inks, and then embossed it using the Cuttlebug Branches Folder.


Isn't this little image adorable? I had to copy Lauren on the faux stitching too... thanks Lauren! :-)

Totally off the topic, I've been checking out Kevin & Amanda's Blog lately, I used to use it for the Peas for Fonts Section, where you can get hundreds; literally HUNDREDS of adorable fonts for scrapbooking, signs, etc for FREE! Amazingly, Amanda creates them based on submissions people make and lets everyone have them for free! I use them all the time for things around my house and even at work when I need signs, and my handwriting isn't 'pretty' enough but normal Times New Roman or Tahoma isn't personal enough; feel me?
So, back to the topic ( I get excited easily... lol) and she did a post on Bokeh photography. Bokeh is actually just a 'background' if you will, and I was intriqued. Of course, being me I searched and searched on how to do it perfectly, and realized that she has the best description and directions anywhere on the web (better than my fellow photographers even!). So, using this tutorial; I took a few little shots of things like this--
Isn't it pretty? The christmas lights on the tree really make it sparkle. :-) So, a thanks to Amanda too; because she totally motivated me to try something new, and I may even use this in my photography shoots throughout the year now. By the way; have you looked at my photography site lately?
Thanks for stopping by today!
Dawn