Showing posts with label stamping. Show all posts

Monday, January 16, 2012

Winter is Here!!!

Winter is here, and along with that goes dry skin and chapped lips.

I made some Lemon Sugar Scrub, for myself and to give as little gifts. It was really simple, I adjusted the recipe some for my liking; and may try and find a substitute for the olive oil, and not because of any reason other than I think it clings a little too well to skin.


Yesterday, Zoe and I spent time in the backyard. She wanted to make a snowman, I thought it may be an issue that our backyard is mostly trees, so we missed A LOT of the snow that would normally hit the ground. We managed to make it work, and although he's a little homely looking we did get a snowman.


Somehow, his nose is missing today. She isn't real thrilled about that.


In the evening, I whipped up a card using some of the new things I got for christmas. Since we just moved, I haven't had the time (or the patience to sort through and find things!) to make anything. I got a Fiskars Continuous Stamp Wheel from my hubbs and I love it! Look how pretty the card turned out? I like the subtle stamped image. I couldn't figure out how to make it a better impression, or darker for the sake of explaining, but it worked well. He also bought me gobs and gobs of clear stamps, so that flower stamp came from one of the sets. I used Zoe's Markers (because they were close. Lazy? Me, nooo.... okay, maybe a little!)

Inside:


Cheers and have a great day!

Thursday, July 1, 2010

:: Single Stamp :: 5 Projects :: Project #4 :: Bookmark

For project #4 of this weeks goodie show-- I've made a bookmark. I was actually sitting in my scraproom, cleaning up things and stumbled across the metalic papers that I used in this project, in a sampler pack that I got for free from a company I ordered envelopes and bulk cardstock from. It worked out nicely that everything from this project was essentially a scrap, or doomed for the recycle.

I stamped the flower twice on Curious Metallics Gold Paper (80# I believe) with Staz On Ink in Jet Black and cut it out. I adhered the bottom flower with my ATG Gun, to smooth it against the cotton ribbon, and then pop dotted the upper flower to give it more dimension. The brown layer is Stardream Metallics in Bronze. I embossed it using my Branches A2 Cuttlebug folder.

Even the white 'cardstock' is actually a piece of very sturdy posterboard, left over from making wedding signs. I put this piece on the back, to hide the ribbon backing and the back side of the embossed paper for a more finished look.

I hope you've enjoyed day 4 of my 5 projects, I can't wait to show off what I have done for tomorrow!! :-)

Wednesday, June 30, 2010

:: Single Stamp:: 5 Projects :: Project #3 :: Stamps as Embellishments ::

Hey Everyone!

I hope you are enjoying this week! It's much more 'themed' than I have ever done before- but I think that is fun for some people, right? It also makes me realize how versatile a lot of the things I own are, and I'd never given them a chance.

My GIANT card order shipped this afternoon and should make it to the final destination in 5-7 days (allllll the way across the country, and down!) and I'll get to see what the buyer thinks of the designs I used!

For today, I decided to make a 12X12 Scrapbook Layout. I don't do a lot of layouts, and have some photos of Zoe gardening that I need to get into the more recent scrapbook.

The background, green paper is from My Minds Eye.


Of course, I used the stamp of this week-- and made embellishments with them! I stamped them with Staz On Ink in Jet Black-- colored them in with varying colors of watercolor pencils, blended to perfection and cut them out. I used pop dots to adhere them to the layout.


I used embroidery floss as my stem, and also made some leaves out of the floss by tying a simple bow.
I used Once Upon A Princess for the Title, since I dislike having to stick letters together for words, I can never get them lined up even, and therefore not looking so cute!

For the photo mats, I used DCWV Animal Crackers Mat Stack, and left them whole. Cutting the Argyle (shift) Layer from the Wild Card Cartridge in white cardstock at 6.5". I set it on top of the mats, trimming about 1/8th of an inch, to make them fit perfect. I was hoping they'd look like garden trellises, and I think they do!


Enjoy!

Tuesday, June 29, 2010

:: Single Stamp:: 5 Projects :: Project #2 ::Altered Notebook

Hi Everyone! I hope all is well!


I worked yesterday at the barn, and am headed out there this morning also! Tomorrow, I have to go shopping and pick up my clothes for my brothers wedding in Maui (seriously, slap on the wrist for me... I'm such a procrastinator with things like that!) I also have just about NO summer clothes, since I'm in Washington State and you never know what you're gonna get with the summers here. Last summer was about 75-90 degrees all summer long, and the summer before wasn't nearly as warm. So, since I'm headed to Maui, I have purchased a new swimsuit, a shirtdress, white tank top and white linen pants for the trip. Of course I have lots of Old Navy Flip Flops coming with too. lol. Adam got some new boxer briefs last week, so that may be what he ends up wearing the whole trip, since I don't think he has ANY summer clothes that fit either!

If you see a blonde in filthy (once) white clothes, with pink flip flops, holding hands with some guy bare foot in boxer briefs in Maui- that's us. Please excuse our laziness!


Alright, enough rambling... you've been waiting for THIS:


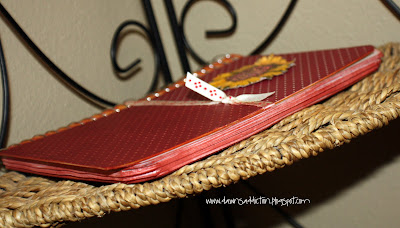
For this day, I decided to make an Altered Notebook. I used a plain Mead 80 page spiral notebook. I believe the size I used was 5"X7". The first thing I did, was use my corner rounder, and rounded the edges on the opening side of the book. I also did this with all 80 ruled pages (no worries here, since the pages are much thinner than normal cardstock, I could snip quite a few at a time.)

I then adhered patterned paper (yep, the same pattern from yesterday) over the cover, leaving the spine of the book open, so it didn't interfere with the opening and closing of the notebook. I also used the remnant of the ribbon from yesterday to wrap around the cover, and tie it for some detail. I used my Distress Ink in Fired Brick, to add some color to the bottom half of the cover, as well as all the edges when the book is closed. It will make the pages look nice when they are pulled out.

Then, as promised- I adhered the featured stamp to the center, top half of the cover with a pop dot. I used the same coloring as yesterdays. You can see the details on that by visiting yesterday's blog post.

I hope you enjoy, and let me know if you have any questions!!

Monday, June 28, 2010

:: Single Stamp :: 5 Projects :: Project #1::

For this project, I made two sets of cards. 6 cards per set, and they are blank inside.

I used white cardstock, tim holtz distress inks in tea dye and antique linen, then layered on a piece of patterned card stock. I then spritzed it all with Tattered Angels Glimmer Mist to give it a sheen.

The stamp, I stamped onto white cardstock that I had distressed first, using black Staz On Ink. After letting that dry (pretty quick) I colored in the sunflower with yellow and red watercolor pencils, and then blended them a little. I used my embossing gun to dry them quickly. I also spritzed those with my Tattered Angels Glimmer Mist.


I hope you like the project for today!! I made two, one for a friend and the other is listed over on my Etsy Sale Site.

I will put a posting up here soon about how I bag and tag things for sale. :-) As you can see, I use reclosable cello bags, and make the toppers.

Sunday, June 27, 2010

: : : stamp this week : : : : Sunflower Stamp : : : 5 days : : : 5 Projects: : :

Hey Everyone!

So this week, I will be super swamped with getting ready for Maui!! Poor me, right?! Poor me or not, I've got so much to get done before we can fly out! I don't want to leave you guys with nothing to look at, and no inspiration... so I've decided to whip out one of my favorite, but least used stamps and see what I can create with it.


My goal this week, is to use the same stamp for each project but make 5 items each different 'things'. Cards, Layouts, Mini-Books or Notebooks, I may dable in it all, and you'll get to see the outcome!


This is the stamp I will use.... It is from the $1 bin @ Joannes, and was out a few months back.
Hopefully, you have it (if you are like me, and see anything in the dollar bin, that could remotely make something cute... you should already have it. Along with my paper addiction, I am also addicted to the $1 clear stamps) ... but, being that most people are rational and don't randomly buy stamps everytime they walk into Joanne's, Michaels or the other stores... it can be purchased here.
So, starting tomorrow... I will get the first project posted. It is ADORABLE if I do say so myself....
Also, the next stamp I'm going to use (like next week, or whenever I do this 5 projects in a week deal) will be this one. It is also a $1 stamp from Joannes, but just noticed it today, and think it's cute too!