


My Soon to be sister in law (the whole reason I get to go to Maui!) is getting back into blogging. I LOVED reading her older postings, and she has commited to keeping her blog updated. She is a witty, sarcastic girl who posts cool things that insire her. Check it out over at
http://www.idontcookorclean.blogspot.com/
I wanted to share one of her posts, that is awesome for us scrapbookers/papercrafters-- I know I've shared Peas for Fonts before, but there is another one that is great for themed fonts. Check out her post here- and then link over and grab some cool Simpson, Spongebob Square Pants and all the other fonts available!
Wednesday, June 30, 2010
:: Single Stamp:: 5 Projects :: Project #3 :: Stamps as Embellishments ::
Hey Everyone!
I hope you are enjoying this week! It's much more 'themed' than I have ever done before- but I think that is fun for some people, right? It also makes me realize how versatile a lot of the things I own are, and I'd never given them a chance.
My GIANT card order shipped this afternoon and should make it to the final destination in 5-7 days (allllll the way across the country, and down!) and I'll get to see what the buyer thinks of the designs I used!
For today, I decided to make a 12X12 Scrapbook Layout. I don't do a lot of layouts, and have some photos of Zoe gardening that I need to get into the more recent scrapbook.
The background, green paper is from My Minds Eye.
 Of course, I used the stamp of this week-- and made embellishments with them! I stamped them with Staz On Ink in Jet Black-- colored them in with varying colors of watercolor pencils, blended to perfection and cut them out. I used pop dots to adhere them to the layout.

I used embroidery floss as my stem, and also made some leaves out of the floss by tying a simple bow.
I hope you are enjoying this week! It's much more 'themed' than I have ever done before- but I think that is fun for some people, right? It also makes me realize how versatile a lot of the things I own are, and I'd never given them a chance.
My GIANT card order shipped this afternoon and should make it to the final destination in 5-7 days (allllll the way across the country, and down!) and I'll get to see what the buyer thinks of the designs I used!
For today, I decided to make a 12X12 Scrapbook Layout. I don't do a lot of layouts, and have some photos of Zoe gardening that I need to get into the more recent scrapbook.
The background, green paper is from My Minds Eye.
Of course, I used the stamp of this week-- and made embellishments with them! I stamped them with Staz On Ink in Jet Black-- colored them in with varying colors of watercolor pencils, blended to perfection and cut them out. I used pop dots to adhere them to the layout.I used embroidery floss as my stem, and also made some leaves out of the floss by tying a simple bow.
I used Once Upon A Princess for the Title, since I dislike having to stick letters together for words, I can never get them lined up even, and therefore not looking so cute!
For the photo mats, I used DCWV Animal Crackers Mat Stack, and left them whole. Cutting the Argyle (shift) Layer from the Wild Card Cartridge in white cardstock at 6.5". I set it on top of the mats, trimming about 1/8th of an inch, to make them fit perfect.  I was hoping they'd look like garden trellises, and I think they do!
I was hoping they'd look like garden trellises, and I think they do!
Enjoy!
Tuesday, June 29, 2010
:: Single Stamp:: 5 Projects :: Project #2 ::Altered Notebook
Hi Everyone! I hope all is well!
I worked yesterday at the barn, and am headed out there this morning also! Tomorrow, I have to go shopping and pick up my clothes for my brothers wedding in Maui (seriously, slap on the wrist for me... I'm such a procrastinator with things like that!) I also have just about NO summer clothes, since I'm in Washington State and you never know what you're gonna get with the summers here. Last summer was about 75-90 degrees all summer long, and the summer before wasn't nearly as warm. So, since I'm headed to Maui, I have purchased a new swimsuit, a shirtdress, white tank top and white linen pants for the trip. Of course I have lots of Old Navy Flip Flops coming with too. lol. Adam got some new boxer briefs last week, so that may be what he ends up wearing the whole trip, since I don't think he has ANY summer clothes that fit either!
If you see a blonde in filthy (once) white clothes, with pink flip flops, holding hands with some guy bare foot in boxer briefs in Maui- that's us. Please excuse our laziness!
Alright, enough rambling... you've been waiting for THIS:

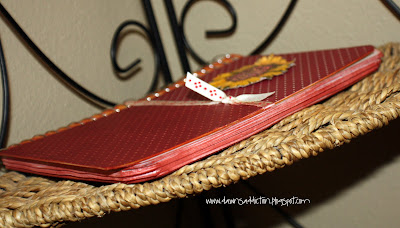 For this day, I decided to make an Altered Notebook. I used a plain Mead 80 page spiral notebook. I believe the size I used was 5"X7". The first thing I did, was use my corner rounder, and rounded the edges on the opening side of the book. I also did this with all 80 ruled pages (no worries here, since the pages are much thinner than normal cardstock, I could snip quite a few at a time.)
I then adhered patterned paper (yep, the same pattern from yesterday) over the cover, leaving the spine of the book open, so it didn't interfere with the opening and closing of the notebook. I also used the remnant of the ribbon from yesterday to wrap around the cover, and tie it for some detail. I used my Distress Ink in Fired Brick, to add some color to the bottom half of the cover, as well as all the edges when the book is closed. It will make the pages look nice when they are pulled out.
Then, as promised- I adhered the featured stamp to the center, top half of the cover with a pop dot. I used the same coloring as yesterdays. You can see the details on that by visiting yesterday's blog post.
I hope you enjoy, and let me know if you have any questions!!
Monday, June 28, 2010
:: Single Stamp :: 5 Projects :: Project #1::
For this project, I made two sets of cards. 6 cards per set, and they are blank inside.
 I used white cardstock, tim holtz distress inks in tea dye and antique linen, then layered on a piece of patterned card stock. I then spritzed it all with Tattered Angels Glimmer Mist to give it a sheen.
 The stamp, I stamped onto white cardstock that I had distressed first, using black Staz On Ink. After letting that dry (pretty quick) I colored in the sunflower with yellow and red watercolor pencils, and then blended them a little. I used my embossing gun to dry them quickly. I also spritzed those with my Tattered Angels Glimmer Mist.

I hope you like the project for today!! I made two, one for a friend and the other is listed over on my Etsy Sale Site.
I will put a posting up here soon about how I bag and tag things for sale. :-) As you can see, I use reclosable cello bags, and make the toppers.
 I used white cardstock, tim holtz distress inks in tea dye and antique linen, then layered on a piece of patterned card stock. I then spritzed it all with Tattered Angels Glimmer Mist to give it a sheen.
 The stamp, I stamped onto white cardstock that I had distressed first, using black Staz On Ink. After letting that dry (pretty quick) I colored in the sunflower with yellow and red watercolor pencils, and then blended them a little. I used my embossing gun to dry them quickly. I also spritzed those with my Tattered Angels Glimmer Mist.
I hope you like the project for today!! I made two, one for a friend and the other is listed over on my Etsy Sale Site.
I will put a posting up here soon about how I bag and tag things for sale. :-) As you can see, I use reclosable cello bags, and make the toppers.
Sunday, June 27, 2010
: : : stamp this week : : : : Sunflower Stamp : : : 5 days : : : 5 Projects: : :
Hey Everyone!
So this week, I will be super swamped with getting ready for Maui!! Poor me, right?! Poor me or not, I've got so much to get done before we can fly out! I don't want to leave you guys with nothing to look at, and no inspiration... so I've decided to whip out one of my favorite, but least used stamps and see what I can create with it.
My goal this week, is to use the same stamp for each project but make 5 items each different 'things'. Cards, Layouts, Mini-Books or Notebooks, I may dable in it all, and you'll get to see the outcome!

This is the stamp I will use.... It is from the $1 bin @ Joannes, and was out a few months back.
Hopefully, you have it (if you are like me, and see anything in the dollar bin, that could remotely make something cute... you should already have it. Along with my paper addiction, I am also addicted to the $1 clear stamps) ... but, being that most people are rational and don't randomly buy stamps everytime they walk into Joanne's, Michaels or the other stores... it can be purchased here.
So, starting tomorrow... I will get the first project posted. It is ADORABLE if I do say so myself....
Also, the next stamp I'm going to use (like next week, or whenever I do this 5 projects in a week deal) will be this one. It is also a $1 stamp from Joannes, but just noticed it today, and think it's cute too!
Everett Farmer's Market
 Flowers and veggies. Yum!
 All the market vendors from across the pier.
 This morning, was a beautiful overcast Everett Morning.
Saturday, June 26, 2010
Walk N Rock @ Safeco Field in Seattle

Today, the Walk n Rock for the TEARS foundation took place. I've been looking forward to this since I heard about it, and can say I wasn't prepared for my emotions today! All was good in the world with me this morning (except for the fact that my baby is gone... and Krispy Kreme made a HORRIBLE mocha, but nbd there).
Below is Adam and Zoe, holding hands and walking in front of me... and I couldn't help but get a couple photos of daddy and Zoe.

As soon as Knox's little photo came up on the big screen at Safeco Field, I instantly burst into tears. The field was lined with butterflies; they had one name per butterfly and had the name on one baby who had died.

A good friend of mine, Danielle lost her daughter Kailey Pearl, at 34 weeks. They were not helped by the TEARS foundation, because they didn't know about it, but they had Team Kailey Pearl today, and walked along with us, Team Knox.

 This is Noah, he is a friend of mine's son, adorable little guy. His mom and I were both pregnant together, and Noah is about two months or so younger than Knox. He came with his momma to walk with us for his friend in heaven.
 At the Walk N Rock, the total raised for the TEARS foundation, to help other families who will lose children soon.... $52,000.00! Amazing! If each family recieves 500, like we did that is over 100 families. I am amazed everytime I see Sarah Slack, the founder as well as a parent who lost a child- the compassion that is just her never fails to amaze me. She is an amazing and compassionate woman who truely is blessed with the ability to help other people every day.
Thank you Sarah for putting on an amazing function, and I'm so glad we got to be a part of it!
Friday, June 25, 2010
Big Card order, and update!
I know I haven't been blogging as much as usual about my crafty stuff... I wanted to share with you all why, and what I've been working on!
 If we are facebook friends, you know I recently got a GIANT order for 500 cards through my Etsy Sale Site, and I need to get them shipped before I leave for Maui, on the 4th of July.
I've been busting my butt to get those done. I've hooked a few photos of what they are emerging to look like on here. Below is a close up of the cards. There are about 5 different patterns, since it is somewhat difficult to come across 100 sheets of the same 12X12 patterned paper. They all have this same saying on them though.

'The Purpose of Life is to Discover your gift. The Meaning of life is to give it away'
 I am really working hard to get all of these finished up today, so I can mail them later today, or Monday at the latest. For some reason, Zoe is being quite a whiner today so I'm not sure how sucessful it will be. We have lunch plans with my mom, and the Walk n Rock is tomorrow at Safeco Field. Feel free to hop on over to the Team Knox page, or check out Knox's Story as I updated it with some photos and whatnot. For those of you, who haven't donated to Team Knox yet- THERE IS STILL TIME!

If we are facebook friends, you know I recently got a GIANT order for 500 cards through my Etsy Sale Site, and I need to get them shipped before I leave for Maui, on the 4th of July. I've been busting my butt to get those done. I've hooked a few photos of what they are emerging to look like on here. Below is a close up of the cards. There are about 5 different patterns, since it is somewhat difficult to come across 100 sheets of the same 12X12 patterned paper. They all have this same saying on them though.
'The Purpose of Life is to Discover your gift. The Meaning of life is to give it away'


 I am really working hard to get all of these finished up today, so I can mail them later today, or Monday at the latest. For some reason, Zoe is being quite a whiner today so I'm not sure how sucessful it will be. We have lunch plans with my mom, and the Walk n Rock is tomorrow at Safeco Field. Feel free to hop on over to the Team Knox page, or check out Knox's Story as I updated it with some photos and whatnot. For those of you, who haven't donated to Team Knox yet- THERE IS STILL TIME!
 I am also going to bribe you and say that anyone who makes any donation to Team Knox... I will send you some FREE handmade cards, just email me when you make the donation with your address so I can ship them at my personal cost to you! I don't know exactly what yet, but probably a combination of Happy Birthday and Thinking of You cards. :-)
Recipe:
(makes 6 cards)
for this specific card (in most of the photos, with the blue background and maroon floral pattern)
1 sheet 12X12 Making memories 'delaney floral' print paper, cut into 4X5.25 pieces
3 sheets 8.5X11 Kraft Cardstock, cut hot dog style (11X 4.25) and folded in half (to form a 5.5X4.25 card)
Embroidery Floss, your choice of color- I used brown
6 pretty buttons
6 copies of the phrase you wish to use
corner rounder
1. fold the 4X5.25 piece of kraft cardstock in half, round the lower right hand corner of both front and back of kraft cardstock. It should have the crease on the TOP of the card (lengthwise).
2. with each of the 6 patterned papers (cut to 4X5.25") round the lower right hand corner.
3. adhere patterned paper to kraft card.
4. adhere your phrase/saying to the front of the card, towards the upper left side.
5. tie the embroidery floss around the front of the card, making a small knot to hold it snug around the card front.
6. thread the embroidery floss through two of the button holes, and make a little double knot to hold it there as well. snip off the excess floss, leaving as much as you'd like to dangle.
7. sit back and enjoy this beautiful card!
Have an awesome day, and by next week I should be back on my normal daily blogging routine! I will be in Hawaii (Maui) on my honeymoon July 4th through the 11th-- so I may not do any blogging that week. We will see! we're going to be doing lots og hiking and sight seeing, so I'm hoping to have some amazing photographs to share. I also will get to shoot my first wedding, on the black beach on Maui, so I can't wait to share those memories as well!

Thursday, June 24, 2010
Miss You Like Crazy
Today, I've been working around the house.
Zoe is being such a sweetie for me (which is a shock, really)!
I am doing some Walk n Rock Stuff, trying to get the last minute family members signed up, and wrangle in as many last minute donations as I can.
My mind is flooded with thoughts of Knox today.
You got here, and my heart just KNEW how to love you.
when you left so quickly, my heart never learned how to live without you.
i don't think it will ever know how to.

i can claim that I would be happy with just one more day with you.
At least I could properly tell you goodbye and how i love you so.
One more day wouldn't be enough.
I have a whole lifetime of memories I see you making in my mind that I won't get to watch. Crawling, walking and more laughing.
your few weeks of laughing is not fair.
you deserved 90 years more of those laughs.
there won't be a day in my life i don't think about you or cry for you.
most friends and family dont see the tears stream down my cheeks at least once a day, usually more but i cry everyday-- i miss you so much.
Today, it just hurts to breathe.
I miss you so much.
nothing can ever change the pain my heart feels
People have asked 'why don't you have another baby?'
Knox, you know why: nothing and no one can ever replace the love I have for you.
Mommy loves you to the moon and back, that will never change. No matter how long I have to suffer without you, I will do it and can't wait to see you again.
Love you buddy,
Mommy
Updated Scraproom Stills
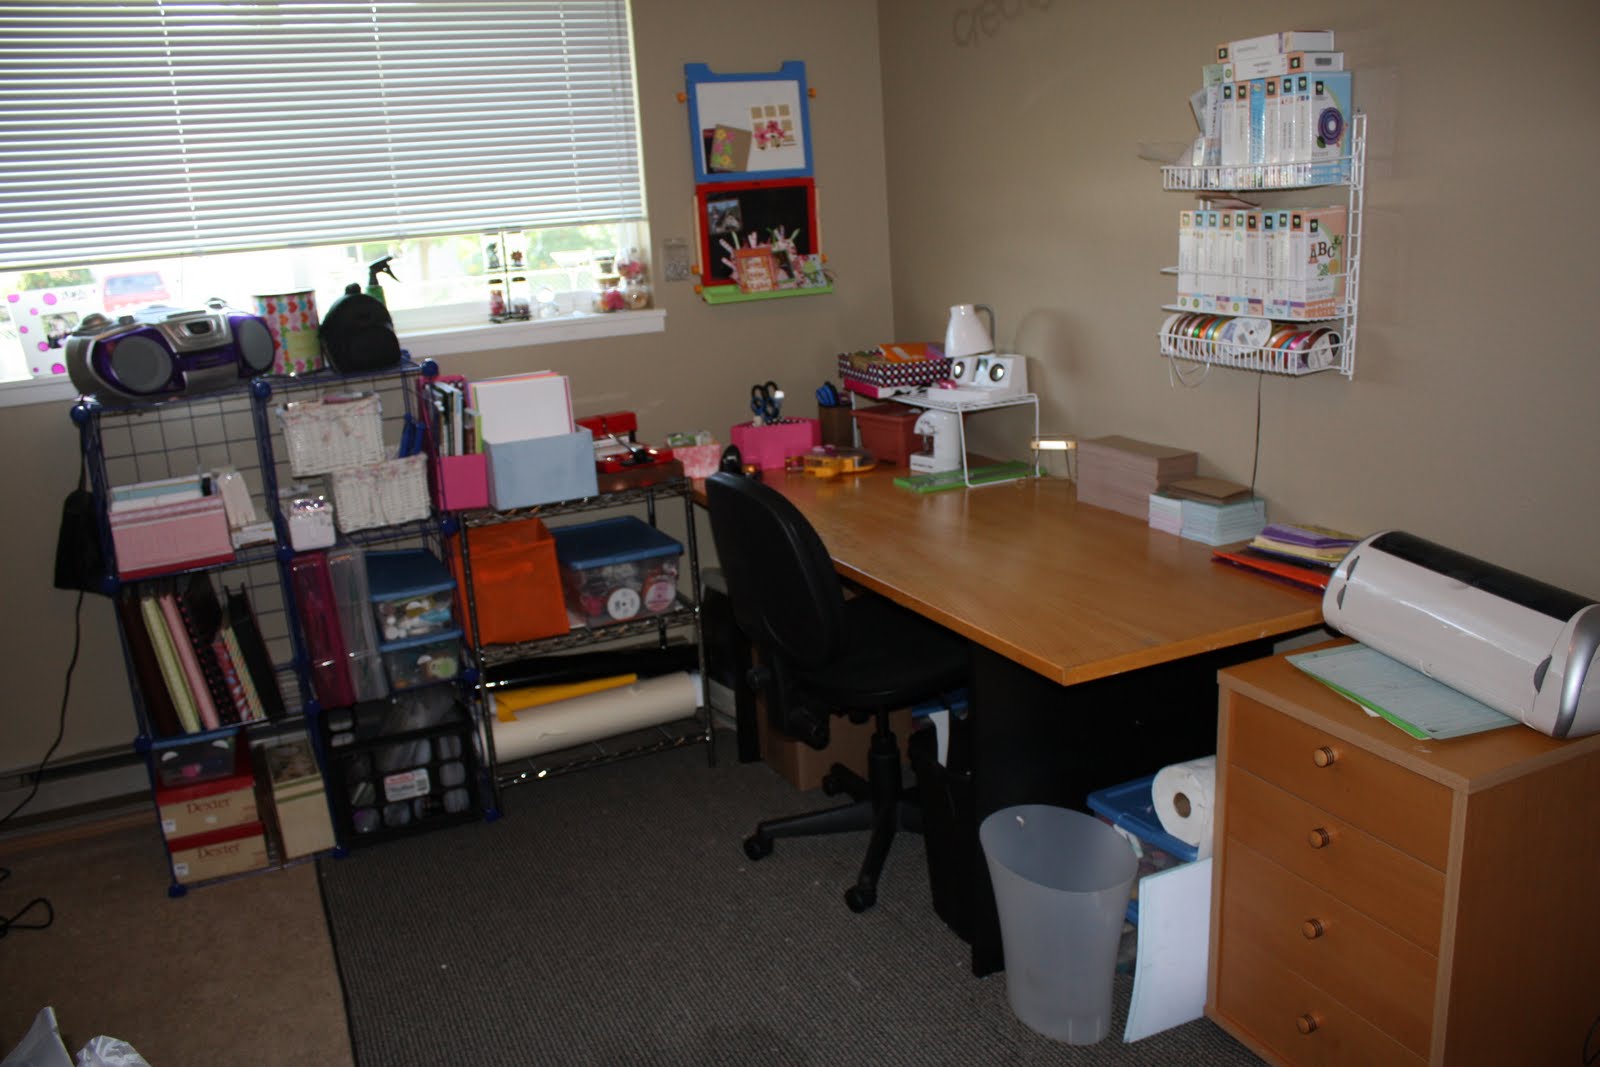


I've done some severe re-organizing, and wanted to share. The desk is in the same place, since it's huge, and impossible to move (alone at least!) so I wanted to get some stills up!
Wednesday, June 23, 2010
Papercraft Star Challenge #1
This was my first challenge as an official designer, and I can say I pulled out all the stops and put on my big girl panties for this one!
 I got lucky, and just before I found out about the challenge-- got my now brother in law's senior graduation announcement. His school colors are Red, White & Bling (aka silver) so I based my card for him on the challenge.

Recipe:
1 piece of white cardstock
I got lucky, and just before I found out about the challenge-- got my now brother in law's senior graduation announcement. His school colors are Red, White & Bling (aka silver) so I based my card for him on the challenge.Recipe:
1 piece of white cardstock
(cut to 8.5"X4.25" and folded in half to form an A2 card)
1 sheet of red cardstock
1 sheet of white cardstock
Cricut Machine
Storybook Cartridge
1 sheet of red cardstock
1 sheet of white cardstock
Cricut Machine
Storybook Cartridge
(for the Marquee3 image cut and shadowed on the card front @ 3")
Accent Essentials Cartridge
Accent Essentials Cartridge
(for the Accent34s image cut at 1", 1.25" & 1.5" stars in alternating colors, then layered)
Studio G, wood 'congrats' stamp
Studio G, wood 'congrats' stamp
Black Stamp Pad
(I used the Stazon Ink in Jet Black)
red sharpie brand pen
white & bling ribbon
silver & black rhinestones
red sharpie brand pen
white & bling ribbon
silver & black rhinestones

On the inside, I typed out his class motto in a pretty font- it is from Peas for Fonts, an awesome site that supplies FREE font downloads for scrapbooking and card making. I use them all the time and they range from really goofy and fun- to serious and pretty. So, I printed it on the computer in a nice looking font, I matted it with red and stuck it inside, as well as made another similar star for the inside. I left plenty of room for a nice note from us!
Papercraft Star is a new, challenge blog. It is unique in the way that the public can vote-- yes, VOTE on their favorite entry for the challenge. The winner is then a 'people's choice winner' instead of a random drawing. Those are fun, but I tend to be a little competitive so it is fun to see a real 'winner'! There is also a forum over on Papercraft Star where you can talk and ask questions as well as get to know the designers and learn new techniques and information.
I hope you'll come on over... the water is fine!

Tuesday, June 22, 2010
Hunka Chunka Chewy Chocolate Chip Cookies & a Lauren's Creative Project!
So, I know I enticed all of you with promises of seeing cookies-- and you will get to, but first more importantly, I need to share this amazing idea and video over at Lauren's Creative. I know that not everyone has kids, or wants them or plans to have them. But: everyone needs baby wipes. Be it in your craft room or car, purse or diaper bag; they are a must have for every woman. Being that I no longer (should) have to wipe butts and noses (but I do still) I try to keep wipes with me at all times, but get sick of carrying around the plastic bag packs, that crinkle in my purse and make so much noise, I feel like I'm doing something wrong with them!
Lauren over at Lauren's Creative is also a wonderful mother to an adorable little girl. She makes her little girl all kinds of cool stuff; from hair clips and ties to just adorable little girl related things. The one I had my heart set on fabric-lifting (is that even possible?) was this.
She made an A-D-O-R-A-B-L-E wipe case! I always seem to lose those stinkin' hard cases as soon as I buy them. I think that my daughter may eat them, because seriously- they don't even make it in the house from the store. I made this one for someone else special (who reads my blog and has a small child, or children maybe.....) and it fits her personality, and I loved the pattern. Sooooo cute, and I had fun making it.

 There is a great video to show you how and there is also a recipe. I'm leaving this to Lauren, because she's done such a great job of it!
Here is another I whipped up real quick, and I think I like this one as much as the first! It would almost make a perfect little clutch!


Now... onto the cookies!!
 These are called 'Hunka Chunka Chewy Chocolate Chip Cookies' and they are from the book 'Sticky, Chewy, Messy, Gooey Treats for Kids' by Jill O'Connor. We got it as a wedding gift (along with some amazing kitchen goodies) and I have been eyeing this recipe for a few days now. I had to go grocery shopping today, so I got myself dark brown sugar and chocolate chips, since they were the two things I didn't have around.
Hunka Chunka Chewy Chocolate Chip Cookies
From Sticky, Chewy, Messy, Gooey Treats for Kids by Jill O'Connor (Chronicle Books, 2009)
Makes 18 big (like REALLY big, bigger then a softball big) cookies
1 cup (2 sticks) unsalted butter, melted and cooled
1 cup firmly packed dark brown sugar
1 cup granulated sugar
1 tablespoon pure vanilla extract
2 eggs, plus 1 egg yolk
3 cups all-purpose flour
1 teaspoon baking soda
1 teaspoon salt
3 cups semisweet chocolate chips
Line 2 baking sheets with parchment paper or coat lightly with nonstick cooking spray. Set aside. (I didn't bother, I used silicone baking sheets on my cookie sheets and they always work!)
In a large bowl, mix together the melted butter, sugars, vanilla, eggs, and egg yolk. Sift the flour, baking soda, and salt into the bowl and stir the ingredients together to form a soft dough. Stir in the chocolate chips.
Using a 2-ounce self-releasing ice-cream scoop or a 1/4-cup measuring cup, form large balls of cookie dough. Place on a parchment paper-lined baking sheet, 9 to a sheet to allow room for spreading, and chill the dough for at least 30 minutes or up to overnight.
Preheat the oven to 350°F.
Bake the cookies until they are golden brown and crisp around the edges but still slightly soft in the center, 15 to 17 minutes. Transfer to a wire rack and allow cookies to cool completely on the baking sheet before eating.
Anyways, Zoe watched me make these, and was helping the whole way through ('light on! light on! (in the oven)) and then the demands of cookies. Which after they cooled a little I gladly gave her to taste. YUMMMMM-- they were definitely better than the Albertson's cookies we worship around here, and really not too difficult to make.
Enjoy!
Dawn
Sunday, June 20, 2010
Happy Father's Day!
Today is Father's Day... and Zoe and I have some funfetti pancakes cooking while I type, I'm getting ready to start the bacon and eggs, as well as whip out the father's day presents. Did I mention, part of Father's Day is that Adam gets to sleep in? So, he's not awake just yet. I didn't do anything too crafty for Father's Day. My dad is getting the card from this post.
 Adam's card (above) was made by Zoe at Michael's yesterday during their make and take. I decided to forgo a fancy made by mommy card this year, since Zoe is getting old enough to help out! She was so happy with the card she made.
 Since we had Zoe- I have always done a framed photo of the kids for Father's Day.
When Zoe was 7 months old, in 2008 it looked like this:

and Above, is the photo of me and my dad that he will get tonight at dinner!
Adam's card (above) was made by Zoe at Michael's yesterday during their make and take. I decided to forgo a fancy made by mommy card this year, since Zoe is getting old enough to help out! She was so happy with the card she made. Since we had Zoe- I have always done a framed photo of the kids for Father's Day.
When Zoe was 7 months old, in 2008 it looked like this:

After we had Knox in 2009- I decided that instead of fighting to get both kids looking at me, and in the same photo - I'd do two. So I printed little things, Zoe's said 'I love you daddy!' and Knox's said 'I love you too!'. He was (obviously) too young to hold it, so I laid him next to it and did the photo that way. So, this was 2009's Father's Day Photos.
 Ever since Knox died; this photo has been a favorite of almost everyone. Most people look at his photos, and think 'I love you buddy, or we miss you' and it's so nice to see his little respone, of 'I love you too!'
And- this is the one I chose for this year. It was just taken during the wedding about a week ago!  He is getting that from Zoe, and the Itunes gift card from me! :-)
Happy Father's Day to all the daddys in the world!

and Above, is the photo of me and my dad that he will get tonight at dinner!
Subscribe to:
Posts (Atom)